Thursday, December 17, 2009
natural building
while this house incorporates something as far from natural as shipping containers, we also will incorporate techniques such as straw bale infill walls, natural plasters and some natural tree trunks as beams and support for the stair case. But, that will be next summer, when we start the job up again. The last thing that we did was return to the site in Dec. to get an inspection on the rough plumbing and the placement and welding of the containers so that we could get another 180 day stretch of time on our building permit. So now we are good till sometime in June. Really, the permit is good for 4 years, but they want to avoid having jobs abandoned, so they put the stipulation of building activity (needing an inspection), every 180 days. It doesn't make sense that anyone who has spent as much effort on the project as we have would abandon it, but that is the requirement.
Tuesday, December 15, 2009
More natural building

Here are couple more photos of some of the natural buildings we were around or worked on while in Tlaxcala. One is of a staircase using a juniper tree trunk, and the other is of an adobe wall, with decorative natutral earthen plaster (which, when it includes some of the sap from a cactus pad and is polished, reamains quite water proof).

We also went to visit David Laws, who lives at the end of the Mississippi neighborhood and is trained as in classical Japanese carpentry and joinery. We visited his shop and a job that he is doing in Vancouver, and we saw some very fine, elegant work in the traditional Japanese style. If anyone would like something done in that style, from garden house to a whole house, he is the man to talk to
Sunday, December 13, 2009
natural building in Mexico

We haven't posted anything lately because the weather here is not conducive to working on the project, and also because we were in Mexico working at a project we support there. It involves reforestation and also classes in natural building. We are including some photos of some of the buildings there and hope that they will be of interest to some of you.
This is an old adobe house that is being rebuilt with various techniques, including cob and straw bale as well as adobe. 

What you are looking at here is an adobe floor, finished with linseed oil and beeswax.
Friday, November 6, 2009
speaking of walls
Since I mentioned walls, if might be interesting to mention here that we are planning on covering one wall of the lower 20 footer with either adobe blocks (if we can get them made) or else cob (one step less). This will be an interior wall that will act as a trombe wall or heat storage unit. It will be partly in the glassed-in entry and partly in the living room area which will also receive a lot of light. The hope is that at least some of the time in the cooler months, it will receive enough sunlight to warm it up and then it will transmit it's warmth back, both into the living room space as well as the bedroom which shares that common wall. In addition we plan to put a wood stove against that wall, perhaps with a coil on it, which we would use to circulate hot water through the lower part of the wall. That would allow the wall to absorb the radiant heat from the stove as well as the conduction heat from the hot water. We'll see how all of this works out.
Tuesday, November 3, 2009
Things to consider
Many people have asked us how we are going to finish the walls, which does present several options. To begin with, you must remember that in the price of the container there comes a complete structural framing system, which will stand alone. Therefore, with any wall treatment or finish that you may consider, you should also think about whether or not it would require "furring out"or not in order to be able to apply that treatment. If you must, then you may be using the same amount of lumber that you would use in a conventional framing system, thereby negating any savings that may be afforded by the container's structure. In addition you must also consider electrical wiring and placement of plug-ins and switches. Therefore, you might simply paint an interior wall, which costs nothing extra, really. Or you might apply an earthen plaster, or a lime based plaster, which might require you to provide some sort of attachment points, such as some screwed on tabs, or just screw tips, or some attached chicken wire, etc., again, a thing that you would probably have to do in a conventional setting.
If you wanted to apply for example, wainscoting, you could screw on a couple of 1x4 strips to attach to, and the same would go for Sheetrock - both of these being some additional input, but minimal. Adhesive could be used, but it might involve an input that could be toxic, depending on the type of glue.
Those are just some of the the thoughts that we have had as we have considered what we will do with the container walls that are exposed inside the house. I say that because some will be covered by kitchen cabinets, and some with bookshelves, and some with adobe, and some (in the bathroom) being necessarily built as dividers, or plumbing walls, thereby substantially reducing the number of walls to be finished.
Enough for now. Exterior walls require other ideas.
Tuesday, October 27, 2009
container details
It occurs to me that someone might be interested in a few more details about containers. For example, they come in two standard sizes, 20ft long and 40ft long, plus what are known as high cube containers whose inside height dimension is about a foot greater than that of a standard, which is about 7ft 10in. You can also obtain what are known as garment containers, that have only had garments shipped in them, hence they are extremely clean and have never had anything that might be considered toxic, such as an oil product, shipped in them.
All of them have a floor made of a very hard 1 & 1/8th in. plywood, screwed to steel joists that are on 12in spacing. The 20's are the most in demand (I think because the military uses them), and they therefore command a price only slightly lower than that of a 40 footer.
There are more factoids stored in my brain if you are interested.
Saturday, October 24, 2009
crawl space
Thinking about the plumbing, it fits here to mention the lack of a large crawl space under the house. This will be what our engineer called a conditioned space, which means that it will have no air exchange and be sealed off, thereby allowing the air temperature in the space to slowly arrive at the same ambient temperature as that of the interior of the house. This means that it is more difficult to deal with anything that must pass under the house such as plumbing, and all such issues must be thought out and dealt with early on. The alternative would be a standard stem wall with a standard crawl space. That would use more concrete, but facilitate the resolution of other things such as plumbing.
Friday, October 23, 2009
Some rough plumbing

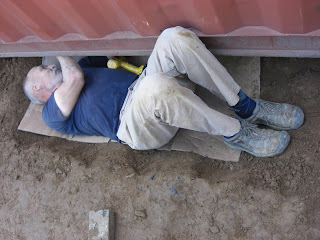
As we got a couple of dry days again, we decided to try to get the rough drain plumbing under the floor of the container and into the space that will be the bath. We wanted to do it in the dry because it means me (Fred) laying on my back in the dirt partially under the container to connect everything. Not an activity for rain and mud. Also, if we do it now, we are that much farther along when we need to pour the slab and work on the bath.
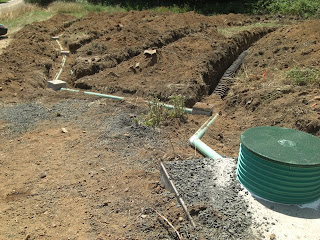
About the bath: we had originally planned on 2 baths, one up and one down, but the height or level of the septic tank relative to the floor level of the containers ended up making it impossible to get the drains under the far (20ft) container where the bath would go. The long and short is that we decided to move the bath and only have one, on the ground floor, which we like a whole lot better, is much simpler, and allows the possibility of having the hot water heater quite near both the bath and the kitchen.

Thursday, October 22, 2009
grounding
We visited an electrical contractor to check on any oddities that we might need to be on the watch for. He said (as I suspected) that the thing will be quite well grounded since it is all welded together and welded to the plates that are set into the concrete piers that serve as a foundation. He did say that we are required to have a ufer ground anyplace that we have a continuous foundation, which would mean the kitchen/living area where there will be a slab. But it is simply a 20 foot piece of #4 re-bar that extends up out of the footing that you can tie into the panel, to connect the whole thing together. Quite simple, really.
Wednesday, October 21, 2009
lumber and humidity

As you might imagine, if you load a bunch of lumber into a water tight container like we have done, there will be a certain amount of moisture given off, with no place to go. Anticipating that, we bought a dehumidifier and 250 ft of 12-2g wire (which we will later use to wire the house) and connected the "cord" to the power at the well house. Sure enough, the marvelous machine began to suck water out of the air at a great rate. We hope that over time the lumber will dry out nic ely.
ely.
 ely.
ely.Tuesday, October 13, 2009
Rainy Fall
With the weather turning cold and damp we are now going to take advantage of one aspect of the containers: the instant storage they offer. Since prices in the construction industry are as soft now as they have been in a while, we are going to load them with lumber, windows and cabinets so that we have what we need to continue the project next summer.
I guess, however, that we won't try to load anything into the upper container. I don't think our old muscles will quite be up to the task.
Monday, October 12, 2009
moving along
Wednesday, September 23, 2009
Subscribe to:
Comments (Atom)


